07/10/20 The fourth article from the blog series focused on using open-source tools on Unipi PLCs demonstrates how to integrate Unipi indoor air quality sensor communicating via MQTT protocol into Node-RED, using either LoRa or Wi-Fi interface.
Welcome in the fourth article of our blog series. In the previous article, we focused on using the Modbus protocol to connect external peripherals to the Unipi controller. This solution allows you to easily increase the number of available inputs and outputs or to add additional communication interfaces the controller does not feature by default. We also tested a simple way how to communicate with peripherals and how to integrate peripherals into the Node-RED development environment, including a simple calculation of measured values.
In this article, we will focus on another communication protocol - MQTT. To demonstrate its integration, we will again use the Unipi IAQ indoor air quality sensor. This time, however, we will also try using the LoRa radio interface along with Wi-Fi.
What is MQTT?
MQTT is a communication protocol characterized by its low demands on system resources and broad support across programming languages, development environments and other tools. For this reason, the protocol is often utilized in the world of IoT for transmitting data from endpoints to control applications. MQTT uses the producer-broker-consumer hierarchy.
The consumer(s) subscribe to receive messages from one or more topics published by the producer(s). In the demonstration below each topic represents values measured by a single IAQ sensor. In case of LoRa networks topics can also take the form of events such as registering sensors into the network. MQTT broker then acts as a mediator, routing messages between consumers and producers.
Integration options
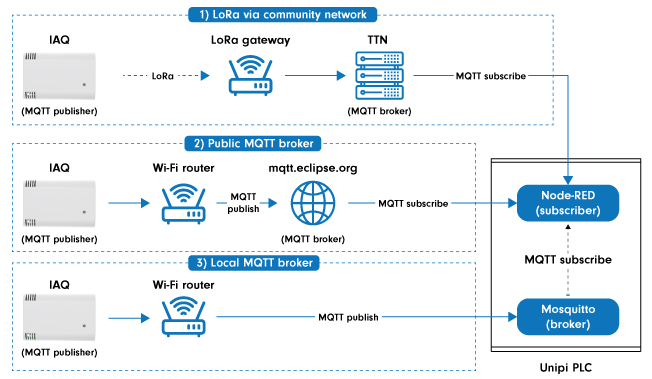
This article shows you three possible ways to integrate the sensor:
Individual roles are assigned as follows:
- Producer - IAQ sensor “producing” the measured values,
- Broker - data router. The picture above shows three different approaches:
- TTN LoRa network community servers,
- public broker (mqtt.eclipse.org)
- local broker running on a Unipi PLC (Mosquitto)
- Consumer - a node in the Node-RED environment
In all cases, the sensor will be represented in Node-RED application by the same MQTT subscriber node regardless of the fact if it is connected via a Wi-Fi access point (examples 2 and 3) or LoRa network (example 1). Let’s elaborate on these examples further.
LoRa
In recent years, the popularity of low-power radio standards has been steadily growing. These technologies utilize unlicensed, freely accessible frequency bands of up to 1 GHz and are thus referred to as Sub-GHz. The characteristic feature of Sub-GHz technologies is their narrow bandwidth, making them unsuitable for transferring large amounts of data. As such, they are used mostly in devices designed for location tracking, measuring physical quantities or collecting data from energy meters. Such applications are then collectively referred to as the Internet of Things (IoT).
A typical example of Sub-GHz technologies is the LoRa standard that is used as one of the integration options.
LoRa in Unipi IAQ products
Due to a large amount of information about LoRa available on the internet (such as this link), it is pointless to state general info about the LoRa standard. That said, we will move to the product we will use for the demonstration - a Unipi indoor air quality sensor. This device was featured in the previous article focused on the Modbus protocol. This time, we will use the RLW-THC variant featuring a LoRa interface.
.jpg)
LoRa device integration options
The device able to communicate via LoRa is now ready, but how do we transfer the measured data into an application? The application can be represented either by a program in a PLC or a database running on a remote server. As LoRa gateways (or, simply put, a receiver) are usually not included in controller default features, users opt for one of the three most frequent options:
- Public operator, ie. a commercial subject that maintains a network of LoRa gateway covering a defined area (eg. a single country). The main advantage here is guaranteed accessibility and quality of coverage. On the other hand, the projects become dependent on a single company and its monetary politics.
- A community network of gateways run and maintained by multiple independent subjects, be it volunteers or organisations, that share a common server stack. This solution can provide coverage for both small (ie. a city district) and large (entire continents) areas. The most popular community network that includes thousands of LoRa gateways all over the globe is The Things Network (TTN).
- A private network, allowing you to cover only a specific area independently on other users, using one or more LoRa gateways. This solution is suitable for small local projects.
TTN community network
Community network is an ideal tool to get acquainted with the technology. The basic user account is available for free. Among the main advantages are wide user base and extensive documentation. Naturally, there are disadvantages as well, namely limited coverage that usually includes only large cities of some countries, and dependence on a single network server service provider.
How to transmit data from TTN servers into our open-source applications? The TTN network offers multiple options - we can either use library packages (SDK) made for various programming languages (Python, Java), or a general interface based on the MQTT protocol. Due to the topic of this article, we will focus on the second option.
The process of creating a new application and adding a device is described in a guide available on this link. A practical example of integrating the Unipi RLW-THC IAQ sensor into the TTN network is the topic of a case study available on this link.
Message receiving test
At this moment we have a data channel between the regularly transmitting RLW-THC sensor and a LoRa gateway or TTN network central servers. To subscribe to messages from the created application the following parameters will be needed:
- User name (Application ID - the name selected during the application’s creation),
- Password (Application Access Key - a unique key, available on the TTN web portal),
- Remote server running the MQTT broker (in Europe, the eu.thethings.network server is used),
- Subscribed topic - a text string usually composed of several levels separated by slashes. For example, it identifies data from a specific sensor in a particular building on a given floor. Thanks to the possibility of replacing one or more levels with a wild-card, it is possible to subscribe to a certain topic group (eg an entire floor) or all topics.
For a quick functionality test, we can use the consumer-realizing mosquitto_sub tool available (along with other tools) in the mosquitto-clients package.
For RLW-THC with serial number 7 the data subscription can look like this (only a short extract is shown):
:~# sudo apt install mosquitto-clients

:~# mosquitto_sub -u unipi_test -P ttn-account-v2.HzbmwU6hRN1EOT7ZhEOKn8XRiJ3WggsCG1pFBhQC3P8 -h eu.thethings.network -d -t 'unipi_test/devices/rlw_thc_7/up'

…

Client mosqsub|8162-martyy-huk received PUBLISH (d0, q0, r0, m0, 'unipi_test/devices/rlw_thc_7/up', ... (668 bytes))

{"app_id":"unipi_test","dev_id":"rlw_thc_7","hardware_serial":"0004A30B00E8C78B","port":1,"counter":2,"payload_raw":"H6wxWYFIHAI8WgI=","payload_fields":{"ambient_light":19.085536923187668,"co2":602,"pressure":985.61,"relative_humidity":35.6,"temperature":27.15999999999999

…

,"latitude":49.21643,"longitude":16.65967,"altitude":256}]}}
Wi-Fi
A slightly different method is used in case of using the MQTT protocol via integrated Wi-Fi instead of the LoRa interface and community network. The main difference lies in the fact we need to provide the MQTT broker first. One of the following options will be most likely used:
- Installation on a device connected to a local network (home server, Unipi PLC etc.). The main advantage of this approach is the independence both on the internet and on other subjects.
- Installation to a private physical or virtual server with a public IP address - this offers the advantage of using one device to run multiple related services such as value database and data visualisation.
- Public MQTT-broker. Suitable for quick application testing. The test.mosquitto.org/, described in detail on this page, can serve as an example. The sensor must be connected to a Wi-Fi network with internet access.
Another difference is in the data format, as data is represented directly in the JSON format as opposed to the binary-encoded LoRa messages.
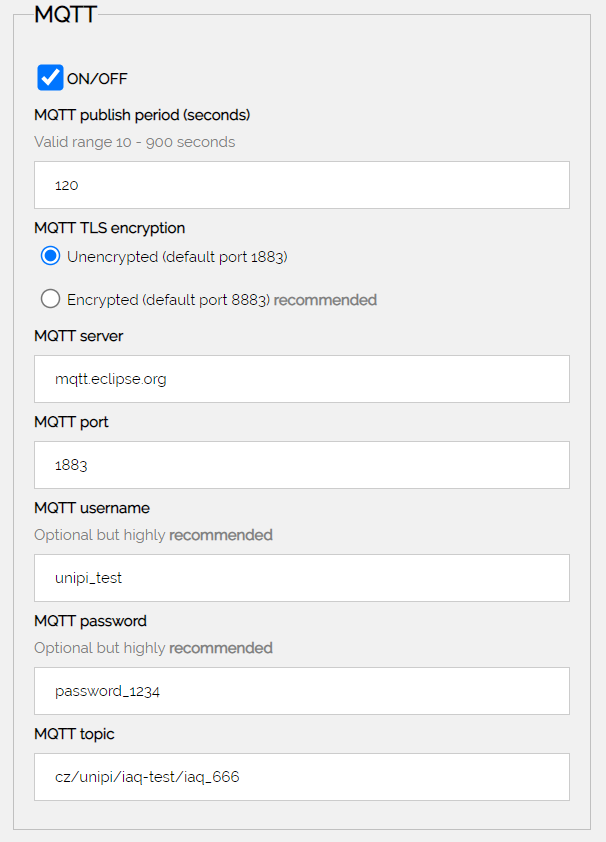
As with LoRa, you need to enable this option and configure it to send MQTT messages via Wi-Fi, using the sensor’s web interface (see the user manual and image below).
Public broker
A useful tool for development and testing, especially if you need to quickly test application functionality. In the demonstration, we use the mqtt.eclipse.org broker designed for this very purpose. Bear in mind messages routed through port 1883 can be displayed by anyone. To secure a live application, we recommend using a TLS encrypted connection along with login and password. The Unipi IAQ sensor supports the TLS as well - in this case, the port 8883 is used.
To receive MQTT messages via a public broker, we can use the same method as with TTN server messages, ie. by using mosquitto_sub. Upon subscribing to the topic, the received messages should be displayed:
:~# mosquitto_sub -h mqtt.eclipse.org -d -t cz/unipi/iaq-test/iaq_666


Client mosqsub|14847-martyy-hu received CONNACK (0)

….

'cz/unipi/iaq-test/iaq_666', ... (476 bytes))

….

"temperature":26.05,"relative_humidity":57.74,"absolute_humidity":14.07,"dew_point":17.07,"CO2":462.22,"atm_pressure":973.07,"ambient_light":34.38,"VOC_index":46.03,"VOC_equiv_CO2":536.74,"VOC_accuracy":1}

...
Local broker
This integration option is suitable for cases where IAQ sensors are connected to a Wi-Fi network without internet access, or if the measured data do not have to be processed outside of the local network (LAN).
In this case, you need to:
- make sure MQTT broker and IAQ sensors are mutually visible within the network, eg. they share the same subnet or routing is set appropriately within intermediate network elements.
- enable (open) the corresponding port (the default TCP 1883) on the device running the MQTT broker.
On Unipi controllers the MQTT broker can be realized in several ways, such as:
- using the Mosquitto tool - a frequently used broker running as a stand-alone Linux OS service. Available as an eponymous Debian package.
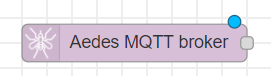
- directly in the Node-RED environment using a node from the node-red-contrib-aedes package. This package is not included by default and must be installed manually - this variant is described below.
Configuration of the IAQ sensor is similar to the public broker. The only difference is entering an IP address/hostname of the device in a local network into the MQTT server field.
To install the broker node into the Node-RED environment, select node-red-contrib-aedes in the Manage palette section and click on Install.

In the Network section of the main node palette, a new Aedes MQTT broker node will appear. All you need to do is to place it into your flow.
The node’s configuration can be left in its default state (except for the username and password).
Username and password serve as the basic security for accessing the MQTT broker. You can configure both in the Security card:
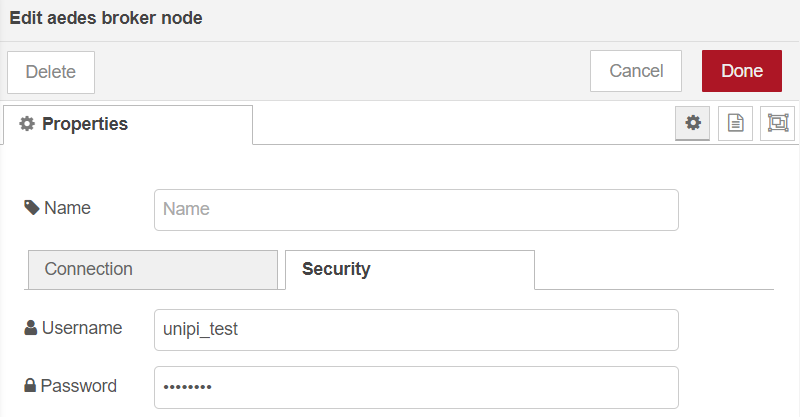
Username and password must match the values entered in the MQTT section of the sensor’s web interface.
Message receiving confirmation is performed in the same way as in previous cases:
:~# mosquitto_sub -u unipi_test -P password -t "#"
As the host parameter (-h) is omitted, the subscriber will connect to a broker running on the same device (localhost). The # is a wild-card that represents subscription to all topics.
The same test can be performed directly in the Node-RED environment using the mqtt in the node connected to the debug node.
Working with data in Node-RED
As with the previous articles, we will use the Unipi Neuron M203 controller using the Node-RED OS image created in the first article. For demonstration, we will use a simple application for switching a ventilator according to a measured CO2 concentration - the application is similar to the heat switching project we created in the second article of the series. We will also visualize the history of some of the values into a graph.
Required nodes for MQTT clients are available in Node-RED by default, ie. you do not need to install them separately as with the Modbus protocol (see the previous article).
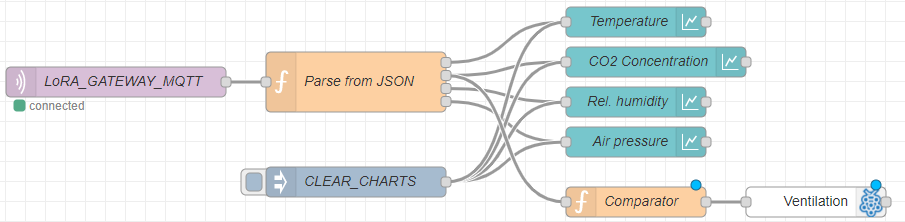
The following demonstration uses only a single mqtt in node representing the MQTT message consumer
![]()
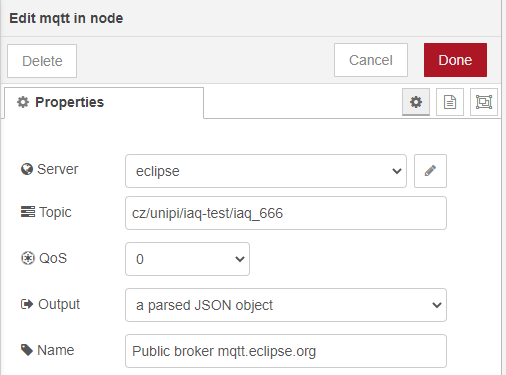
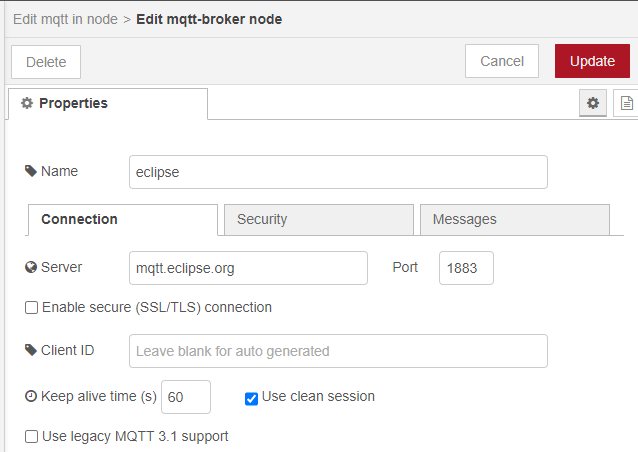
Let us assume we are subscribed for receiving messages from a single sensor via a public broker at mqtt.eclipse.org. The mqtt type node needs to be configured as follows:
As the data are already available in the JSON format, we can easily parse them using the Parse from JSON function. The number of outputs (4 in this case) can be adjusted in the Properties tab under the node’s function body:
var temp = {topic: "temperature", payload: msg.payload.object.temperature };

var co2 = {topic: "co2", payload: msg.payload.object.co2 };

var humid = {topic: "humidity", payload: msg.payload.object.relative_humidity };

var pressure = {topic: "press", payload: msg.payload.object.pressure };


return  [ temp, co2, humid, pressure ];
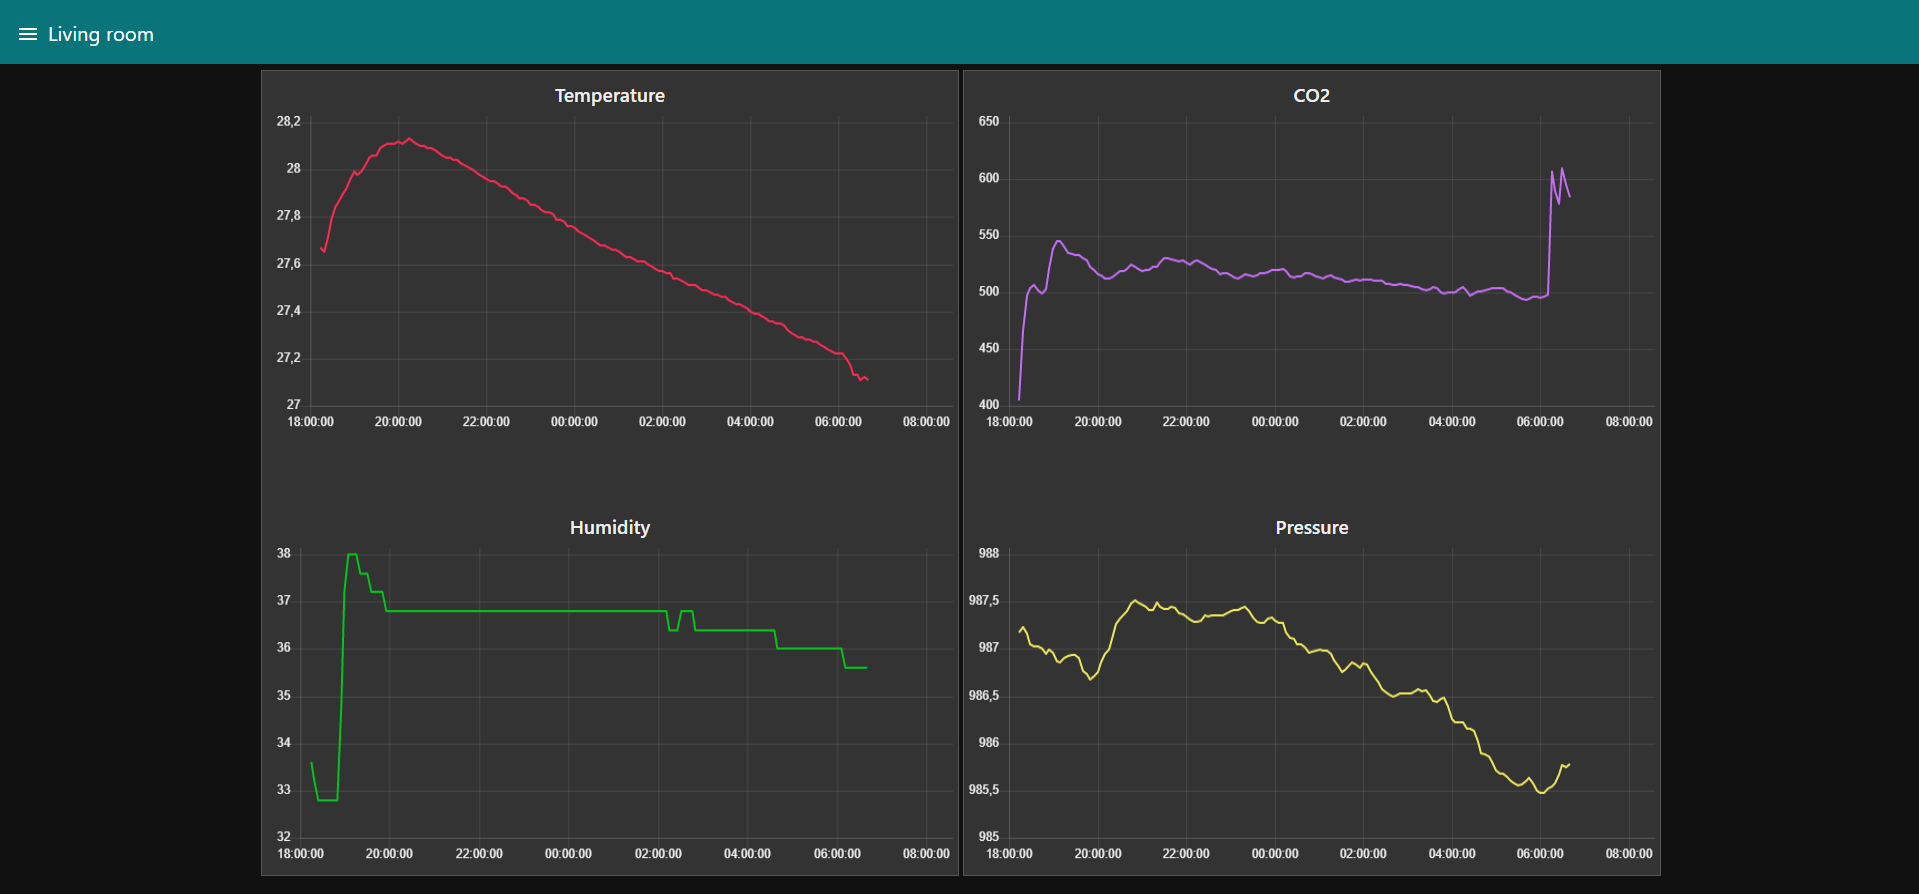
Values of measured parameters from this node then proceed into chart nodes that visualise the value history on a dashboard (a tutorial describing the dashboard basics is available on this link). These nodes are also pre-installed in the Node-RED environment. The CO2 concentration value is then processed by a comparator with hysteresis that switches the ventilator using Neuron PLC’s relay output (for a more detailed description of controller I/O usage, check out the previous blog articles).
The last part of the flow is the inject node that sends empty fields into all graphs (chart-type nodes), deleting all data.

The resulting dashboard containing graphs is available on the following address:
http://<IP ADDRESS>:1880/ui
Conclusion
In this article we integrated the Unipi RLW-THC indoor air quality sensor into the Node-RED, using LoRa and Wi-Fi wireless connection. In both cases, we used the MQTT protocol that is easy to use in the Node-RED environment. This protocol is very common in the world of IoT - that said, a similar method can be used to integrate devices from other vendors into the application.